Discrete LEDs with Python
Welcome back to our micro:bit peripherals in Python series! This installment is an in depth look into discrete LEDs.
Check out the video demo here:
The Breadboard
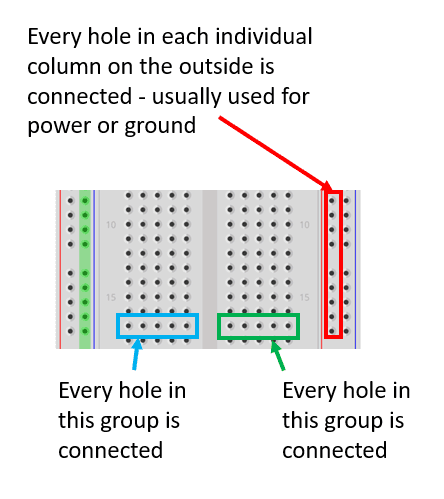
In this example, I am using a breadboard to connect my LED and my resistor to the micro:bit. This is not necessary but makes connecting everything much simpler. This is how a breadboard works:
The Resistor
You’ll notice in the connection diagrams below that I always place a resistor in series with the LED. It is possible to drive an LED from the micro:bit without the resistor, but I don’t recommend it. Without the resistor, you’re putting the burden on the micro:bit to limit how much current is delivered to the LED. The microcontroller chip that’s driving your output pins does have a current-limit capability to protect itself, but that’s not something you want to rely on in general! A resistor allows you – the designer – to set exactly how much current you’d like to drive the LED with, which also controls the brightness.
To choose your resistor follow this excellent guide (opens in a new tab).
LED On, LED Off
Turning the LED on and off is a simple task in Python. Once you have everything hooked up you can simply call the write_digital function on a pin. For example, to turn on an LED connected to pin0:
pin0.write_digital(1)To turn off an LED connected to pin0:
pin0.write_digital(0)That's it!!
Dimming the LED
The micro:bit has a built-in Pulse-Width Modulation system that allows for the dimming of LEDs. This system sends a pulse to the LED. The longer that pulse stays high or “ON”, the brighter the LED will appear. This constant high and low signal is rapidly turning the LED “ON” and “OFF”. It is happening so fast that it appears to be solid to the human eye, but it also appears dimmer.
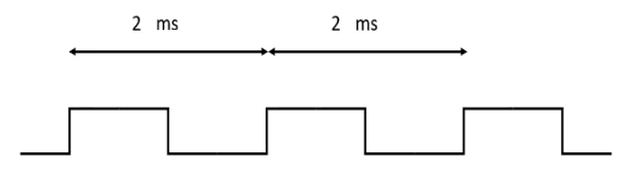
This is what that pulse looks like:

In order to keep the LED from appearing like it is blinking on and off we must set the period of the analog wave that gets sent to the LED with the set_analog_period function. We will set it to 500 Hz which is far faster than the human eye can detect by setting it to a 2 ms period.
pin0.set_analog_period(2)This is what setting the analog period does:
Now we have our frequency set, but how do we set how dim the LED is? We will change how long the pulse stays high or “ON”.
If the pulse stays high for 50% of the time that is approximately 50% brightness. The pulse above shows what a 50% brightness pulse would look like.
OK so how do I set the pulse to be high 50% of the time? We do this by writing data out on the pin with the write_analog function on a pin. This function takes an input in the range of 0 to 1023. This input can be broken down this way:
0 = the line is high or “ON” 0% of the time
511 = the line is high 50% of the time
1023 = the line is high 100% of the time
Since we know that 0.5 is the same as 50% and using some quick micro:bit math we can do this:
pin0.write_analog(0.5 * 1023)To recap. With just two short lines of code you can turn on your LED at 50% power:
pin0.set_analog_period(2)pin0.write_analog(0.5 * 1023)How to Run this Example:
When running any of the code samples below you should:
- Connect the LED as outlined in one of the diagrams below.
- Type one of the code examples below into https://makebit.firialabs.com (opens in a new tab).
- Run the example - the LED should light up for 2 seconds and then turn off.
If you haven't tried CodeSpace with the micro:bit, you're missing out on a FANTASTIC coding experience! Give it a try!
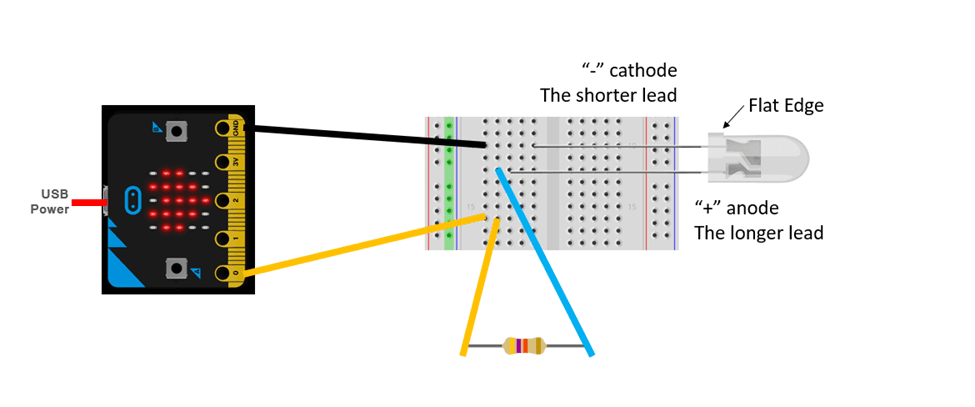
Setting Up the Device
Connect the cathode side of the LED to ground on the micro:bit. Connect the Anode side of the LED to one end of the resistor. Connect the other end of the resistor to the Input / Output pad on the micro:bit. This is the proper way to hook up an LED.
Python Code Examples:
Code Example 1: Bare Minimum Code
from microbit import *

def main():

    pin0.write_digital(1)
    sleep(2000)
    pin0.write_digital(0)

main()
Code Example 2: An Example with Functions
from microbit import *

def set_led_brightness(pin, pct_brightness):
    pin.write_analog(1023 * pct_brightness / 100)

def init_led(pin):
    pin.set_analog_period(2)   # 2 ms = 500 Hz cycle

def main():
    init_led(pin0)
    set_led_brightness(pin0, 100)
    sleep(2000)
    set_led_brightness(pin0, 50)
    sleep(2000)
    set_led_brightness(pin0, 0)

main()
Code Example 3: An Expert "Class" Example
from microbit import *

class LED:
    def __init__(self, io_pin=pin0)
        self.io_pin = io_pin

    def turn_on(self):
        self.io_pin.write_digital(1)

    def turn_off(self)
        self.io_pin.write_digital(0)

# This defaults to pin0.
# to use pin1 instead:
#    led1 = LED(pin1)
led1 = LED()
led1.turn_on()
sleep(2000)
led1.turn_off()